
| 일 | 월 | 화 | 수 | 목 | 금 | 토 |
|---|---|---|---|---|---|---|
| 1 | 2 | 3 | ||||
| 4 | 5 | 6 | 7 | 8 | 9 | 10 |
| 11 | 12 | 13 | 14 | 15 | 16 | 17 |
| 18 | 19 | 20 | 21 | 22 | 23 | 24 |
| 25 | 26 | 27 | 28 | 29 | 30 | 31 |
- 리액트
- 코테
- 파이어베이스
- PCCE
- ReactNative
- 리액트네이티브
- firebase
- 백엔드
- 코딩테스트
- 리액트 네이티브
- controller
- node.js
- 스프링
- project
- 티스토리챌린지
- React Native
- 태그
- 2025 프로그래머스 코드챌린지 2차 예선
- java
- expo
- 자바
- 자바스크립트
- map
- 오블완
- javascript
- 코딩
- 프로젝트
- 프로그래머스
- React
- Spring
- Today
- Total
양갱의 개발 블로그
[리액트 네이티브] react-native Button을 누를 때마다 컴포넌트 추가하기 본문
[리액트 네이티브] react-native Button을 누를 때마다 컴포넌트 추가하기
연지양갱 2023. 7. 9. 16:13컴포넌트를 추가하려면
[]배열에 넣으면 된다
내가 하고 싶은 부분은
버튼은 클릭할 때마다 컴포넌트를 추가해주고 싶다

즉 버튼을 클릭할 떄마다 컴포넌트 내가 만든 태그들을 추가할 수 있다ㅏ
가장 중요한 부분은
useState와 어디에 넣을지가 중요하다!
배열을 넣어주는 concat이 있다!
const [insertTag, setInsertTag] = React.useState([]);useState를 꼭 [] , 배열로 해줘야 한다
그래야지 추가가 된다!!
그리고 버튼을 클릭하면 onPress안에 set을 넣으면 된다ㅏ
concat은 해당 배열에 추가 또 추가 붙여넣기 라고 볼 수 있다
setInsertTag 에 insertTag.concat으로 계속 추가해준다
		{insertTag}
                <Button title="추가" onPress={() =>{

                    setInsertTag(insertTag.concat(<View style={{ paddingHorizontal: 10, }}>
                        <View style={{ padding: 10, flexDirection: 'row', width: '100%', }}>
                            <View style={{ borderBottomWidth: 1, flexDirection: 'row', width: '100%', backgroundColor: "white" }}>
                                <View style={styles.num}>
                                    {/*맵 인덱스 */}
                                    <Text style={{ fontSize: 20 }}>d</Text>
                                </View>
                                <View style={styles.infoName}>
                                    <Text style={{ fontSize: 20 }}>시간</Text>
                                </View>
                                <View style={styles.section}>
                                    <Checkbox style={styles.checkbox} value={aNeat} onValueChange={setAnimalNeat} />
                                    <Text style={styles.paragraph}>확인</Text>
                                </View>
                            </View>
                        </View>
                    </View>
                    ))
                }
                } />
리턴 안에 넣어줌
{insertTag} : 지금까지 추가되거나 입력되었던 내용 출력 => 배열
setInsetTag : 태그를 추가
concat : 붙여넣기 => 배열.concat(붙일 태그)
내 코드
<AddFood.js>
import axios from 'axios';
import { StatusBar } from 'expo-status-bar';
import React from "react";
import { Text, View, StyleSheet, Button, Alert } from 'react-native';
import Checkbox from 'expo-checkbox';
import concat from "react";
//npm install expo-checkbox
//navigation사용할 때 필요
import 'react-native-gesture-handler';
import { NavigationContainer } from "@react-navigation/native";
import { createStackNavigator } from "@react-navigation/stack";
const Stack = createStackNavigator();
//동물 info가져오기
export default function AddFood(navigation) {
const [aName, setAnimalName] = React.useState(""); //애완동물 이름
const [aSex, setAnimalSex] = React.useState(""); //성별
const [aBirth, setAnimalBirth] = React.useState(""); //생일
const [aBreed, setAnimalBreed] = React.useState(""); //종류
const [aNeat, setAnimalNeat] = React.useState(false); //중성화 여부
const [insertTag, setInsertTag] = React.useState([]);
React.useEffect(() => {
//선택한 동물의 정보 가져오려면 props사용해야함
// 서버에 요청
// 애완동물 정보 불러오기
/*
axios.post("http://192.168.2.94:5000/member/mypage", null, {
params : {
id: "user3" //sessionStorage에 있는 id값
}
})
.then(function (res){
console.log(res.data);
setAnimalName(res.data.aName);
setAnimalSex(res.data.aSex);
setAnimalBirth(res.data.abirth);
setAnimalBreed(res.data.abreed);
setAnimalNeat(res.data.aNeat);
})
.catch(function (error){
console.log(error)
})*/
}, []);
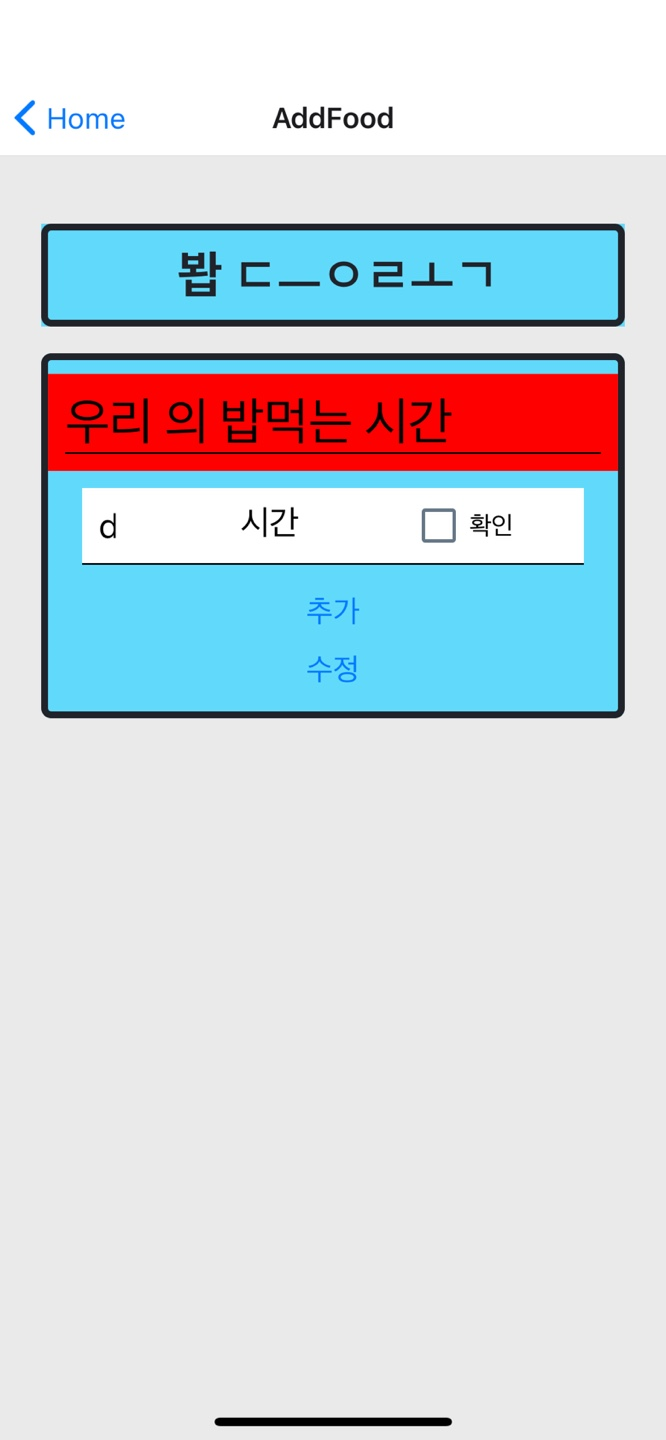
return (
<View style={styles.container}>
<Text style={styles.title}> 봡 ㄷㅡㅇㄹㅗㄱ </Text>
<View style={styles.title}>
<View style={{ padding: 10, backgroundColor: "red" }}>
<View style={{ borderBottomWidth: 1, flexDirection: 'row', width: '100%' }}>
<Text style={{ fontSize: 30 }}>
우리 {aName}의 밥먹는 시간
</Text>
</View>
</View>
{/* map 형식으로 돌면서 등록했던 내용 보여주기 */}
<View style={{ paddingHorizontal: 10, }}>
<View style={{ padding: 10, flexDirection: 'row', width: '100%', }}>
<View style={{ borderBottomWidth: 1, flexDirection: 'row', width: '100%', backgroundColor: "white" }}>
<View style={styles.num}>
{/*맵 인덱스 */}
<Text style={{ fontSize: 20 }}>d</Text>
</View>
<View style={styles.infoName}>
<Text style={{ fontSize: 20 }}>시간</Text>
</View>
<View style={styles.section}>
<Checkbox style={styles.checkbox} value={aNeat} onValueChange={setAnimalNeat} />
<Text style={styles.paragraph}>확인</Text>
</View>
</View>
</View>
</View>
{insertTag}
<Button title="추가" onPress={() =>{
setInsertTag(insertTag.concat(<View style={{ paddingHorizontal: 10, }}>
<View style={{ padding: 10, flexDirection: 'row', width: '100%', }}>
<View style={{ borderBottomWidth: 1, flexDirection: 'row', width: '100%', backgroundColor: "white" }}>
<View style={styles.num}>
{/*맵 인덱스 */}
<Text style={{ fontSize: 20 }}>d</Text>
</View>
<View style={styles.infoName}>
<Text style={{ fontSize: 20 }}>시간</Text>
</View>
<View style={styles.section}>
<Checkbox style={styles.checkbox} value={aNeat} onValueChange={setAnimalNeat} />
<Text style={styles.paragraph}>확인</Text>
</View>
</View>
</View>
</View>
))
}
} />
<View>
<Button title="수정" onPress={() => Alert.alert('Food 페이지로 전환')} />
</View>
</View>
</View>
)
}
style
const styles = StyleSheet.create({
    container: {
        flex: 1,
        padding: 24,
        backgroundColor: '#eaeaea',
    },
    title: {
        marginTop: 16,
        paddingVertical: 8,
        borderWidth: 4,
        borderColor: '#20232a',
        borderRadius: 6,
        backgroundColor: '#61dafb',
        color: '#20232a',
        textAlign: 'center',
        fontSize: 30,
        fontWeight: 'bold',
    },
    num: {
        padding: 10,
        alignItems: 'center',
        width: '10%',
    },
    infoName: {
        padding: 10,
        alignItems: 'center',
        width: "55%",
    },
    info: {
        padding: 10,
        width: "35%",
        alignItems: 'center',
    },
    checkbox: {
        margin: 8,
    },
    paragraph: {
        fontSize: 15,
    },
    section: {
        flexDirection: 'row',
        alignItems: 'center',
    },
});
하지만!
내가 짠 이 코드는 clean 코드가 아니다...
React를 배우지 못했을 때 사용했던 코드이다. set을 몰랐을때..!
왜냐하면 태그 자체를 배열에 넣었기 때문에 좋은 코드는 아니다
데이터 값만 배열에 저장하고 그 값만큼 map을 돌려서 값을 읽어와 태그에 맞춰서 출력하도록 코드를 짜야 한다.
태그를 출력해야 할 때 이 코드를 사용하구,, 값을 null값이어도 추가 해야할 때나 사용할 수도 있지만..!
만든 태그의 값을 또 저장할 때도 문제일 것이다
절대 절대 좋은 코드가 아니다
원래 정석 코드는
useState에 배열을 선언하여 값이 추가될때마다 값을 set해서 추가되면
해당 데이터 값을 map을 돌려서 return 안에 태그값을 넣고 출력해줘야 한다.
'프론트 > React Native, React, Expo' 카테고리의 다른 글
| [리액트 네이티브] non-std C++ exception error 해결하는 방법 (0) | 2023.08.09 |
|---|---|
| [리액트네이티브] react-native 체크 박스 만들기 (Expo) (0) | 2023.07.09 |
| [리액트 네이티브] react-native 위도 경도를 주소로 변환 역 지오로케이션(expo) (0) | 2023.07.08 |
| [리액트네이티브] react-native 값 다음 컴포넌트로 전달하기 (Expo) (0) | 2023.07.08 |
| [리액트 네이티브] react native 확인 취소 알림창(Alert) 띄우기 (0) | 2023.07.07 |

