| 일 | 월 | 화 | 수 | 목 | 금 | 토 |
|---|---|---|---|---|---|---|
| 1 | 2 | 3 | 4 | 5 | 6 | 7 |
| 8 | 9 | 10 | 11 | 12 | 13 | 14 |
| 15 | 16 | 17 | 18 | 19 | 20 | 21 |
| 22 | 23 | 24 | 25 | 26 | 27 | 28 |
- 코딩테스트
- project
- node.js
- 프로그래머스
- 백엔드
- 자바
- 코딩
- 코테
- 티스토리챌린지
- 파이어베이스
- javascript
- 리액트
- 2025 프로그래머스 코드챌린지 2차 예선
- firebase
- controller
- 스프링
- map
- React
- PCCE
- 태그
- React Native
- 리액트 네이티브
- 프로젝트
- java
- 오블완
- ReactNative
- Spring
- expo
- 자바스크립트
- 리액트네이티브
- Today
- Total
양갱의 개발 블로그
[Spring] Thymeleaf의 정의 및 문법, Thymeleaf 프로젝트 생성하기 환경 설정 본문
[Spring] Thymeleaf의 정의 및 문법, Thymeleaf 프로젝트 생성하기 환경 설정
연지양갱 2023. 11. 28. 19:53다시 백엔드 공부를 시작했답니다..!
교재는 코드로 배우는 스프링부트 웹 프로젝트라는 책인데
3학년 때 'AWS 클라우드 기반 웹 풀스택 개발자 교육과정'하면서 학교에서 받은 책이랍니다
그때 백엔드를 하고 싶었는데 마지막 프로젝트까지 백엔드 개발을 못했네요.. 그래서 취업준비 겸 공부도 하고 있답니다

Thymeleaf란?
Thymeleaf는 스프링 MVC 설정과 Thymeleaf라는 기술을 활용할 수 있는데 Thymeleaf는 JSP 대신에 사용하여 화면에 처리합니다.
데이터를 이용하여 동적으로 화면을 만들어주는 역할을 합니
장점
JSP와 유사하게 ${ }을 별도의 처리 없이 이용할 수 있습니다.
Model에 담긴 객체를 화면에서 JavaScript로 처리하기 편리합니다.
연산이나 포맷과 관련된 기능을 추가적인 개발 없이 지원합니다.
개발 도구를 이용할 때 .html 파일로 생성하는데 문제가 없고 별도의 확장자를 이용하지 않습니다.
이제 해당 thymleaf 사용해보겠습니다.
저는 intelliJ를 사용하는데 최신버전이라 교재와 다른 게 많았습니다ㅠㅠ
새로운 프로젝트를 생성해서 Thymeleaf를 사용해보겠습니다.
Thymeleaf 프로젝트 생성하기
1. 새로운 프로젝트 생성해줍니다.


2. next 클릭하여 Thymeleaf dependencies를 추가합니다.
저는 lombok까지 사용할 예정이라 또 추가해줬습니다.
3. Create 클릭

프로젝트 생성 완료!
자동 업데이트 설정하기
application.properties 파일 수정하기

spring.thymeleaf.cache=false위 코드로 수정해주세요
위 사진에 templates.sample로 되어 있는데 실습하다가 중간에 블로그 작성중이라 그럽니다..,!!
원래 이제 막 프로젝트를 생성하면 templates만 있습니다
그리고 다른 부분이 다른 것도 실습 중간이라 아마 내용이 다를 수도 있어요..ㅎ 잘 확인해주세요
Thymeleaf도 JSP 처럼 서버에서 결과를 만들어서 브라우저로 전송합니다.
위의 설정은 이미 만들어진 결과를 서버에 계속 보관할 것인지에 대한 설정입니다.
Thymeleaf파일을 수정하고 저장한 후에 브라우저에서 변경된 결과를 확인하기 위한 설정입니다.
1. 상단의 애플리케이션의 아래화살표 클릭 -> Edit Configurations 클릭

2. Modify options 아래 화살표 클릭
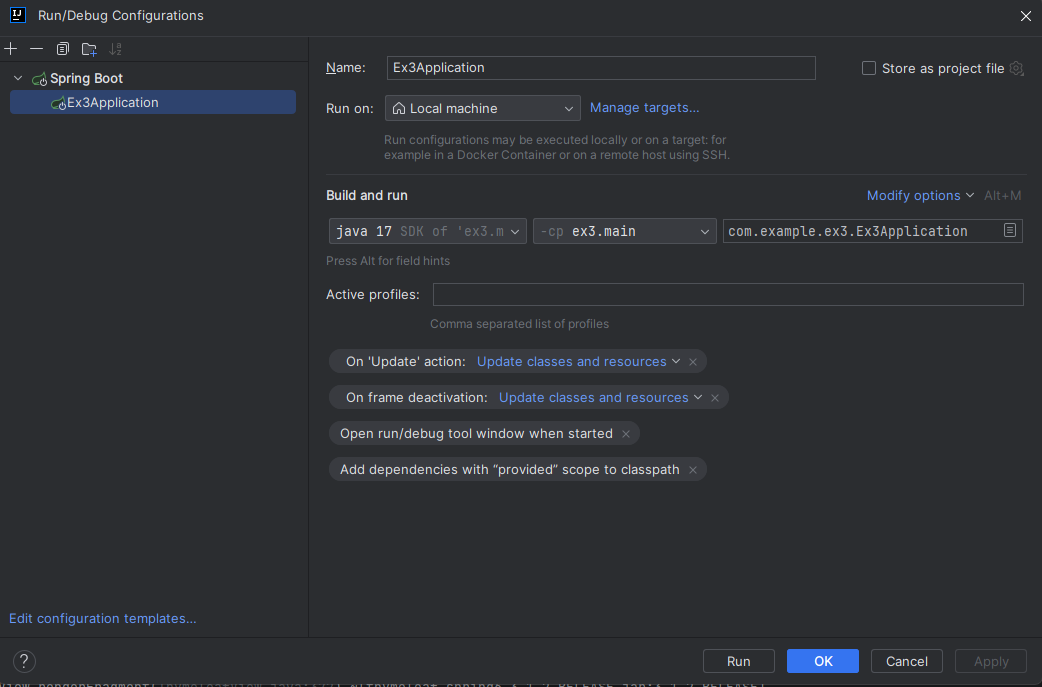
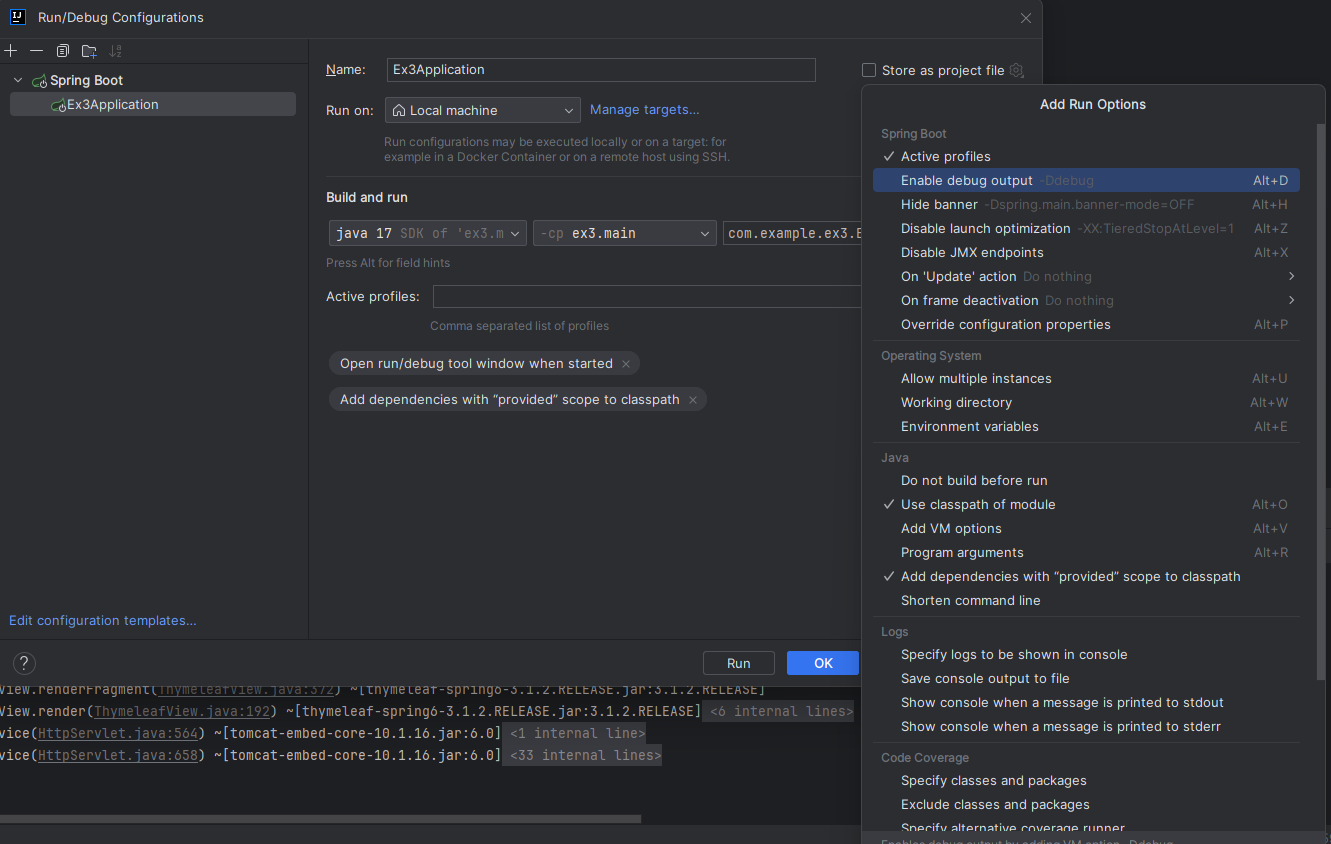
3. 아래 나온 내용을 잘 확인하면 자세히 보면 Do notionf으로 되어 있는 부분이 있는데 이를 'update classes and resources로 지정합니다
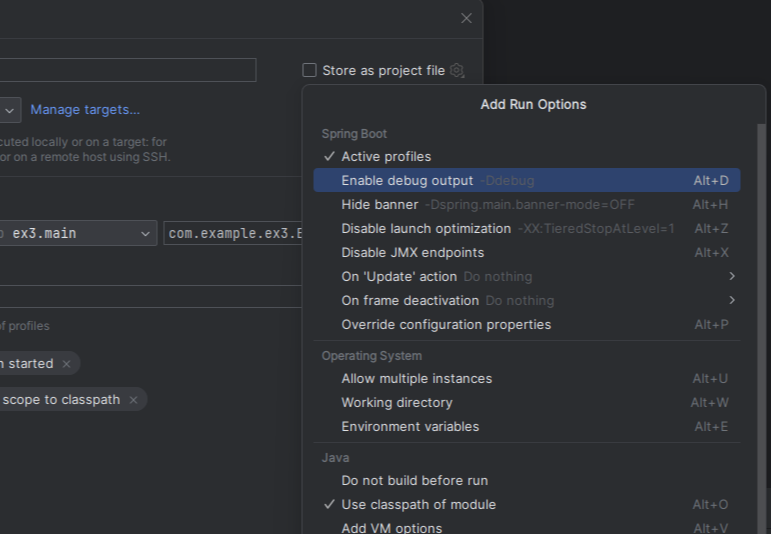
자세히 보면 On 'Updat' action과 On frame deactivation이 Do nothing입니다
이를 'Update classes and resources'로 지정합니다.
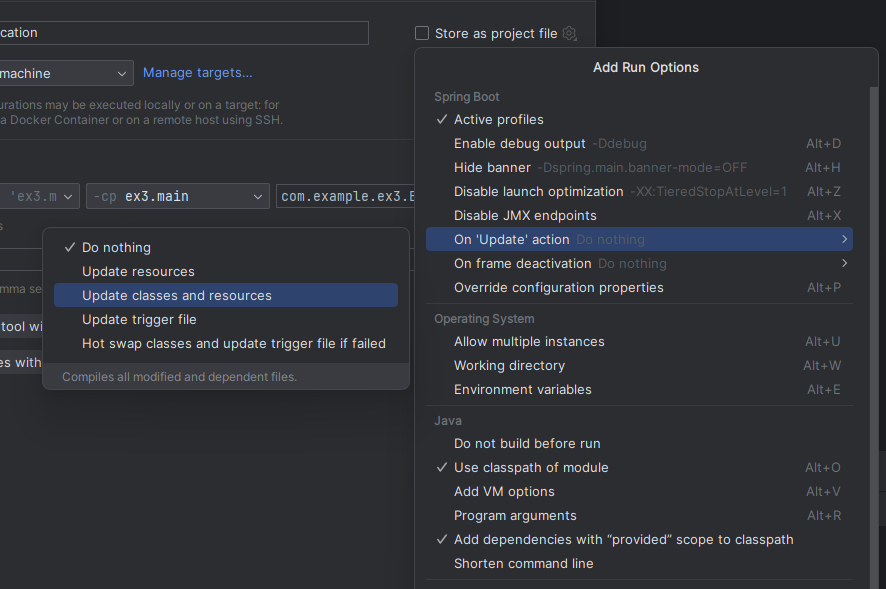

4. Ok를 클릭하면 된다
Thymemleaf 의 기본 사용법
DTO 파일 생성 및 Controller만들기

SampleDTO 클래스
package com.example.ex3.dto;

import lombok.Builder;
import lombok.Data;
import java.time.LocalDateTime;

@Data
@Builder(toBuilder = true)
public class SampleDTO {
    private Long sno;
    private String first;
    private String last;
    private LocalDateTime regTime;

}
SampleController 클래스
package com.example.ex3.controller;

import com.example.ex3.dto.SampleDTO;
import lombok.extern.log4j.Log4j2;
import org.springframework.stereotype.Controller;
import org.springframework.ui.Model;
import org.springframework.web.bind.annotation.GetMapping;
import org.springframework.web.bind.annotation.RequestMapping;

import java.util.List;
import java.util.stream.Collectors;
import java.util.stream.IntStream;
import java.time.LocalDateTime;

@Controller
@RequestMapping("/sample")
@Log4j2
public class SampleController {

    @GetMapping("/ex1")
    public void ex1(){
        log.info("ex1........................");
    }

    @GetMapping("/ex2")
    public void exModel(Model model){
        List<SampleDTO> list = IntStream.rangeClosed(1,20).asLongStream().mapToObj(i -> {
            SampleDTO dto = SampleDTO.builder()
                    .sno(i)
                    .first("First.."+i)
                    .last("Last.."+i)
                    .regTime(LocalDateTime.now())
                    .build();
            return dto;
        }).collect(Collectors.toList());

        model.addAttribute("list",list);
    }
}
사용자의 뷰에 보여질 부분의 html파일
ex2.html
<!DOCTYPE html>
<html lang="en" xmlns:th="http://www.thymeleaf.org">
<head>
  <meta charset="UTF-8">
  <title>Title</title>
</head>
<body>
  <ul>
    <li th:each="dto ${list}">
      [[${dto}]]
    </li>
  </ul>
</body>
</html>
위 코드에서 xmlns:th="http://www.thymeleaf.org" 태그를 사용하요 Thymeleaf 를 사용할 수 있는 것입니다.
localhost:지정포트번호/sample/ex2를 입력하고 접속하면
아래와 같이 출력값을 보여줍니다.

Thymeleaf 문법
th:each = "변수 : ${목록}"위 코드와 비슷하게 사용하여 원하는 데이터를 보일 수 있도록 개발할 수 있습니다.
반복문의 상태(state) 객체
th:each="dto, state: ${list"}ex2.html 파일
<!DOCTYPE html>
<html lang="en" xmlns:th="http://www.thymeleaf.org">
<head>
  <meta charset="UTF-8">
  <title>Title</title>
</head>
<body>
  <ul>
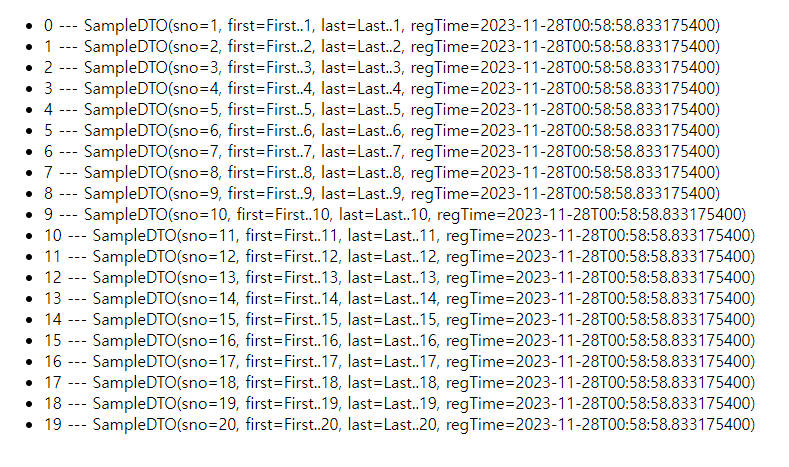
    <li th:each="dto, state : ${list}">
      [[${state.index}]] --- [[${dto}]]
    </li>

  </ul>
</body>
</html>
결과
제어문 처리
th:if ~ unless 등을 이요할 수도 있고, 삼항 연산자 스타일을 사용할 수 있습니다.
th:each="dto, state : ${list}" th:if="${dto.sno %5 ==0}"ex2.html
<!DOCTYPE html>
<html lang="en" xmlns:th="http://www.thymeleaf.org">
<head>
  <meta charset="UTF-8">
  <title>Title</title>
</head>
<body>
  <ul>
    <li th:each="dto, state : ${list}" th:if="${dto.sno %5 ==0}">
      [[${dto}]]
    </li>

  </ul>
</body>
</html>
결과

예시2
ex2
<!DOCTYPE html>
<html lang="en" xmlns:th="http://www.thymeleaf.org">
<head>
  <meta charset="UTF-8">
  <title>Title</title>
</head>
<body>
  <ul>
    <li th:each="dto, state : ${list}">
      <span th:if="${dto.sno%5 == 0}" th:text="${'-------'+dto.sno}"></span>
      <span th:unless="${dto.sno % 5 == 0}" th:text="${dto.first}"></span>
    </li>

  </ul>
</body>
</html>
결과

5의 배수인 값만 ---------sno 값을 보여준다
if와 unless의 차이라고 생각하시면 됩니다.
삼항 연산자도 가능합니다.
th:each="dto, state : ${list}" th:text="${dto.sno %5 ==0} ? ${dto.sno}"
이런식으로 사용하면 됩니다.!!
제어문과 반복문 사용하여 보여주고 싶은 데이터를 정제할 수 있습니다.
계속 공부하면서 또 다른 내용을 알게되면 포스팅 하겠습니다!
'백 > Spring, Spring Boot' 카테고리의 다른 글
| [Spring] Querydsl Q 파일 생성 안됨 문제 해결 (2) | 2023.11.30 |
|---|---|
| [Spring Boot] 인텔리제이(IntelliJ) 최신 버전 spring boot 프로젝트 생성하기 3.x.x 버전 프로젝트 생성하기 (0) | 2023.10.24 |
| [Spring Boot] 스프링 부트 시작하기 전 알아야 하는 내용 (2) | 2023.09.07 |
| [Spring] 유효성 검사, 에러 메시지 보여주기 예제 코드 도서 등록 시 에러 메시지 (0) | 2023.07.12 |
| [Spring] 다국어 처리 properties파일 리소스 파일, 다양한 언어 처리 하기 (0) | 2023.07.06 |


